RSS

How NOT to take care of canvas

Brand new and I have already cocked it up royally. On the last trip, to Brisbane Ranges National Park, it rained a fair amount. And when we got home had to try and dry out the tent in the garage (we don’t have much yard space to speak of). We managed to get the main tent opened up and dried out, and even the extra bedroom. However, I had neglected to take out the annex walls that were packed away nicely in the trailer and they had started to go mouldy.

Bugger. For those that think this is not such a big deal, mould is a canvas’s worst nightmare. There’s not much that can be done to completely remove it without further damage to the canvas itself. Using chemicals, for example, will stain the canvas and very likely remove the waterproofing.

Trying to figure what to do, we googled a whole bunch of stuff on how to get rid of mould on canvas. The consensus seems to be to dry out the canvas as much as possible to kill/stop the mould spreading and then vacuum it, treat it (1 part bleach to 3 parts water, sponge the affected areas, rinse and then let dry), dry it out in the sun, vacuum it again, and then hope for the best.  It remains to be seen just how well the ‘fix’ will last.

Here’s hoping all will be well.

 
Leave a comment

Posted by on June 1, 2012 in Camper Trailers, Camping


Tags: , , , ,

Lighting up the Camper Trailer

Every camper trailer needs some light. And as much as you like carrots and the fact that they do actually improve your vision, they’ve got nothing on a good set of LEDs.

LEDs light the way

LED lights are definitely the way forward when it comes to lighting up a tent and trailer. They are reasonably inexpensive, have a long life span, low power usage and are fairly hardy. They also come in many different formats. Lanterns, strips, torches. You get the idea. eBay and Amazon seem to be the best place to pick up these lights for a reasonable price – although having said that, using the Australian websites will mean you pay more than double what you would if you used the US/UK websites.

I’ve opted for a mix of self adhesive 3-Led push-to-turn-on lights for inside the trailer/toolbox and some DIY LED strips that will be attached to the 12V battery system. The strips will be placed along the poles under the awning and inside the tent. I’ve yet to find out how long the push-on ones last, but seeing as though they use very little power I’m hoping that it’ll be a while before I have to recharge the batteries.

LED Strip - For the DIY Enthusiast

LED Strip

Camping Magnetic LED Light

And here are some photo’s of the lighting in the trailer:

LED Push on Lights

3-LED Push-on Light

These little push-on beauties are great. $8 for a set of 3. I have put two in side the trailer (as above) and one in the toolbox. They take 2 AA batteries and I’ve opted to use rechargeables. They have a couple of self-adhesive tabs to affix them to whatever it is you want to fix them to. But the great part is that they use Velcro; this allows to remove the light and replace the batteries very easily.

Once I’ve had a chance to sort out some of the LED strip lighting and get some photo’s I’ll update this post.

 
Leave a comment

Posted by on June 1, 2012 in Camper Trailers


Tags: , , , , ,

I want one of these…Non-Stick Griddle

I love the internet. It gives me what I need. And I need a griddle/hot plate for the 3 burner gas stove that we have for the camper trailer.

Here is one that should fit the bill nicely.

Non-Stick Griddle/Hot Plate


This particular model is double sided and therefore great for either pancakes/bacon/eggs or steak/chops/sausages. You get the idea.

Now I’m hungry.


Tags: , , , ,

Brisbane Ranges National Park

Our first trip out in the new camper. The Tambo Cooper XT. We haven’t been this excited for a while.

After a bit of preparation and packing up of the kitchen and the trailer, we were ready to head out on our first trip. We chose a spot that wasn’t too far away, mainly because we have two small kids and the weather was looking ominous. If it all went pear shaped then it wouldn’t be much to head back home. Having said that, we were only out for the one night anyway.

Brisbane Ranges National Park - Boar Gully Campsite

Brisbane Ranges National Park – Boar Gully Campsite

Boar Gully Campsite
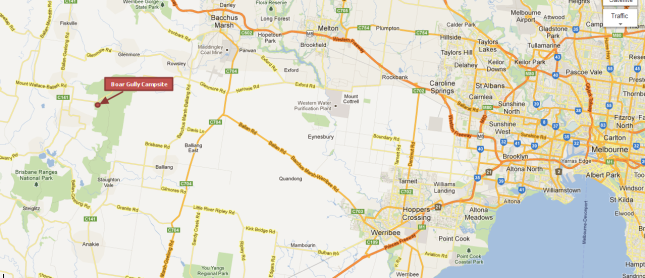
Brisbane ranges - Boar Gully Campsite

Brisbane Ranges – Boar Gully Campsite

Boar Gully campsite is found in the northern part of the Brisbane Ranges National Park, which itself is about a hour’s drive west of Melbourne. The campsite is a basic one, with just a toilet and no showers.There is running water available, but you have to know where to look to find the tap (which evaded us for most of the weekend and we only found it the morning we left). There is only one trailer/caravan spot and several tent sites. All of the site have picnic tables and a fire pit. As I understand it, you need to bring your firewood with you as you are not allowed to pick up wood from the bush.

Setting up the camper for the first time was actually pretty straight forward. We had been shown how to do the set up and pack up by Keith, from Tambo Campers, so it was just a case of remembering in what order we had to do things. We had bought a length of shade-cloth that goes on the ground under the tent – a little protection goes a long way.

Getting the main tent up took us about 10-15 minutes, the extra bedroom about 20 minutes – the zips were a bit of a faff. The awning took another 15 – 20 minutes, but it now attached is staying that way, so all we have to do is pull it down, insert the poles (4 of them) and tie the lot down with guy ropes. We should be able to do it all a lot quicker next time; now that we know what we are doing. Our kitchen is one of those awesome Drifta’s, so it was out and ready to go in about 1 minute flat. Lunch was prepared and kids were fed in record time!
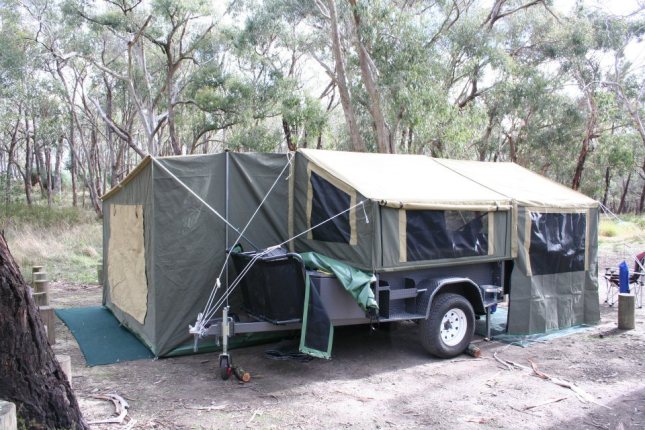
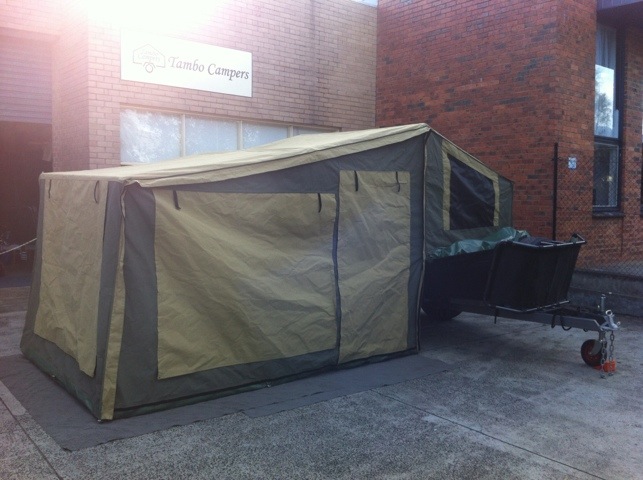
Tambo Cooper XT - All Set Up

“The Hilton”

One thing that I got a little wrong the first time, was the positioning of the shade-cloth (or I should say ground mat). I managed to have excess out the back of the bedroom and not enough out the front under the awning. It also needs to be positioned further underneath the trailer to start with; right up against the tyre. As we will not have the bedroom on that much over the next few trips, I will likely double the ground mat over for the bit that sits under the main tent. When the bedroom is up however, I need to ensure that the ground mat is not more that 6ft from the back of the trailer, otherwise there won’t be enough for under the awning.

Even though we were just camping for the one night, we had set up EVERYTHING. And I mean everything. We needed to see how everything fitted together and worked. The tent is huge, which is a good thing for us. With two kids under 4 and the high probability that it’ll rain when we go out for a weekend (out of the 4 trips we have done since being in Australia it’s rained on 3 of them). The large tent will mean that we have some living space that is dry and comfortable and will allow us to entertain the kids. The extra bedroom will be a great addition when we have the kids’ friends come out with us, or have a relative or two to cater for.
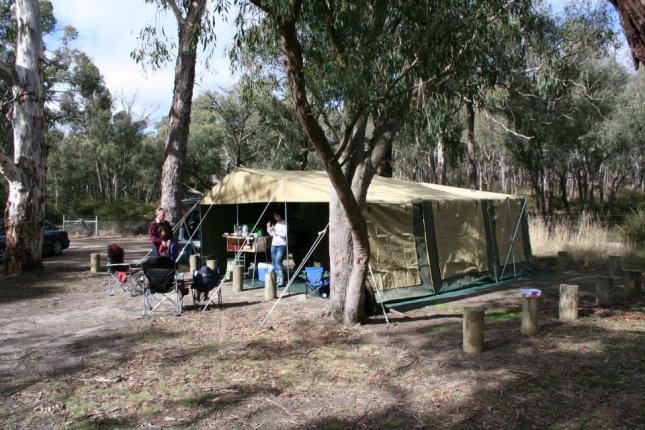
Tambo Cooper XT - All Set Up

“The Hilton”

After much fresh air, a good run around the campsite and preventing a forest fire, the kids had a bit of a nap and then we all went for a hike through the woods to look for koalas, ‘kangaroos and kookaburras. We managed 2 out of 3! On the way back to camp we saw a number of kangaroos, although they weren’t in the national park area but in the farmers paddocks next door. Loads of them. Then we spotted a couple of the iconic kookaburras just as we got back to the campsite.

The weather played along very nicely over the course of the day/evening. It rained lightly on and off every few hours giving the canvas its required bit of ‘seasoning’. Apparently this wetting-drying, wetting-drying cycle helps to shrink the canvas and the stitching and effectively seals the tent and prevents any future leaks (we had a couple during the night, which was expected as the canvas was brand new). So hopefully the next wet trip it will be dry inside!

We were fortunate enough to have the whole campsite to ourselves once the day-trippers had had their fun and had gone home. It was so peaceful and cold. It was fantastic. The only thing missing was a large body of water with some good fighting fish in it. But that’ll be next time when I head up to the Murray River with a few mates.


Tags: , , , , ,

I want one of those…. Flat pack fire pit

Who doesn’t love a good campfire? Exactly, so wouldn’t it be great if you had a contraption that enabled you to have one almost anywhere (that you were allowed to)?

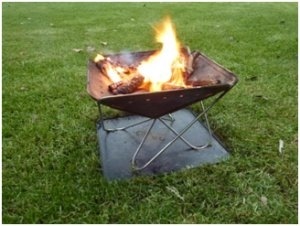
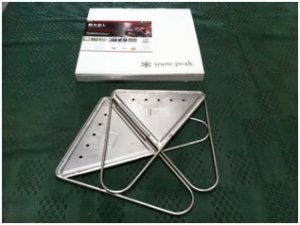
Enter the Snow Peak Fire pit.
A nifty little unit that packs up flat and also saves the grass.

20120523-143142.jpg

20120523-143151.jpg

I can see this being very handy where a fire needs to be contained (always, right?) and there is no fire pit at your camping spot. It even has its own platform to sit on to catch the coals. The fact that it is flat packed is awesome as it means less space in the trailer/4WD.

This will be added to the list.


Tags: ,

A fiery rant.

Some people are just plain ignorant. Some are just @ssholes. Some are both.

IGNORAMUS:

ig.no.ra.mus  noun

Plural ig.no.ra.mus.es / ig.no.ra.mi

:- an utterly ignorant person

IGNORANUS:

ig.nor.an.us noun

Plural ig.nor.an.us.es

:- an utterly ignorant person, who is also an @sshole.

And now here’s the story, you decide which is appropriate.

Day Trippers

Some people just don’t think of others. We arrived at Boar Gully campsite to find about 40 hikers had made full use of the parking area, and our camping spot. Let me explain. Most of the campsites (I’m not talking bush camping here) are clearly marked out with bollards. The bollards are there to ensure that vehicles do not take up residence in an area where you are to put a tent. In campsites that have spots for camper trailers/caravans, the bollards demarcate the location of where the trailer/caravan is to be set up. In our case, the day trippers had parked several cars in the space reserved for our trailer.

We were very fortunate to have arrived just as they were about to start their walk. A few of the ladies who were not participating in the walk and who we had some words with about moving the vehicles ,suggested that we “just wait a few hours”. Bollocks. Get your people back here and move the vehicles. Eventually I had to run after the group and call them back to move their cars. And they were upset that I had done so! Well, don’t park your vehicles in a spot reserved for camping!

Second rant. A few hours after we had set up camp and were wondering about the campsite and surrounds, we noticed that a fire had been left smoldering in one of the other camping spots. Again, part of the group of day trippers had had lunch in one of the camp spots (nothing wrong with that) and had made a fire (nothing wrong with that either). However, hey had neglected to completely extinguish their fire and one of the logs had rolled free of the fire pit and was smoldering ominously near the base of to tree. I shudder to think what could have been had we not moved it back to the safety of the fire pit and ensured that the rest of the fire was put out with a few liters of water – from a tap not 10m away.

Unattended fires are very dangerous things. And after the horrors of the fires here in Australia in 2009 I am very surprised that some people are still clueless. Unattended fires can wreak havoc in the bush. Bush fire anyone??

Secondly, lots of campers have small kids, like us for example. If you have simply left your fire to go out all by itself then it is highly likely that the coals are still smoldering and extremely hot for hours. If a small child happens to run over/ walk through/play in what looks like a sand pit then a hospital visit is on the cards. Of the 250 burn cases (children) last year, 33 of them were from camp fires.

If you don’t know how to put out a fire properly, or have no idea about the dangers of fires, read this document. Produced by the Queensland Fire & Rescue Service:

https://www.fire.qld.gov.au/communitysafety/freesafetydownloads/pdf/campfire_safety.pdf

National Parks are there for everyone not just you, don’t be a selfish git.

Think about others and the environment next time you go camping.


Tags: , , , , ,

Video

Erecting the Tent. A Time Lapse.

A quick video of us setting up the extra large tent:


Tags: , , , , , ,

Installing the Drifta kitchen

The last time I did any form of DIY was just too long ago to remember. Which made the task of installing the Drifta kitchen somewhat daunting.

I needn’t have been worried as instructions were supplied by Drifta, complete with pretty pictures, on how to install the kitchen in a trailer. A Tambo trailer no less. The distinction is important as the Tambos have a lip in the tailgate opening that needs to be catered for.

I’m not going to regurgitate everything on the Drifta website, you can go there to see the details and the pretty pictures yourself, but I will just briefly mention the steps I took to install the kitchen.

It was pretty straight forward to do:

  • Insert skids into the trailer.
  • Place kitchen unit onto the skids.
  • Move the unit into place.
  • Mark the position of the skids with a good marker pen.
  • Remove the kitchen unit and the skids.
  • Measure where the bolt holes will go and mark off in the trailer (this is to make sure you are not drilling to the water tank, or any other critical equipment).
  • Get someone else to check the measurements. Just in case.
  • Drill pilot holes at the marked off points.
  • Drill required sized holes on top of the pilot holes*
  • Put the skids back into place.
  • Screw in the self-tapping screws from the bottom of the trailer into the skids.
  • Replace the kitchen unit.


*This was a great tip I picked up on the forums. Drill a pilot hole before drilling with the final sized bit. This will ensure a nice clean, round hole that the bolt will fit snugly into


Oh, and make sure that your drill battery is charged before you attempt to do the installation. It sucks being half way through where drills dies and you then have to wait for an hour or two before you can finish the job.


I was so busy installing the unit that I forgot to take any pictures! Hopefully I’ll get better at this as time goes by and you will have more informative posts from me. 🙂


Tags: , , ,

Preparing for the first camping trip

Can you ever be totally prepared? I doubt it.

But you need to start somewhere. So now that we have taken ownership of a new camper trailer (our awesome Tambo Cooper XT) we need to spend some time kitting it out and getting it ready for all the future trips we will be going on.

Luckily for us we our camper was ready a week earlier than anticipated, so we had a week to prepare before our first trip out to Boar Gully Camp site in the Brisbane Ranges National Park. This is what we managed to get done before that first trip:

  • Install Drifta Kitchen
  • Install some LED lights in the trailer and the toolbox – these are of the battery type, so no wiring required.
  • Packed up the Drifta kitchen
  • Checked the battery was charged and in working order
  • Packed the trailer
  • Fixed the hitch tow-bar – it was rattling like crazy.
  • Adjusted the brake controller settings to suit a loaded trailer.
  • Took a few pictures

Not too much in the way of DIY just yet, but I know that will come in time. Here are few photos:

;

20120517-125122.jpg

Hitch bar – Duct taped to stop the incessant rattle

Drifta Kitchen all installed!

Drifta Kitchen all installed!


Tags: , , , ,

Picking up the new Tambo Cooper XT

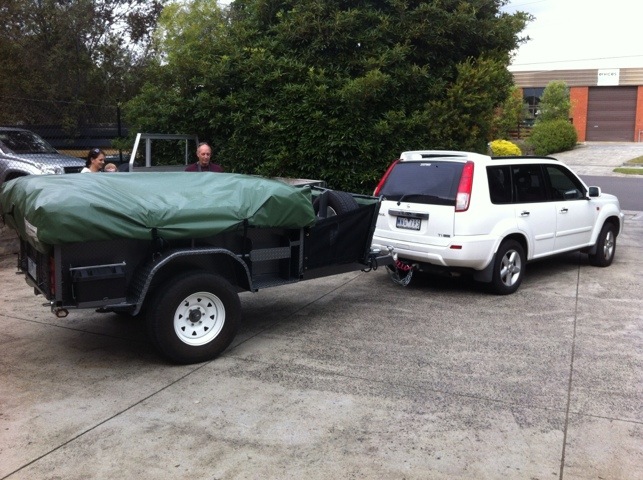
About two weeks ago we finally got the call from Amanda that our Cooper XT was ready for pick up. Almost beside ourselves with excitement we planned our short trip out to Knox, Vic to pick it up.

Arrived at Tambo Campers at just after 9am and there she was in the lot waiting for us. Happy days!!

We were fortunate with the weather, as it had been raining all week, and we’re shown around the camper, how to set it up and pack it up, all the little fixings and everything worked in general. All within about 40 mins.

Needless to say we are chuffed to bits with it and have already planned a number of trips away.

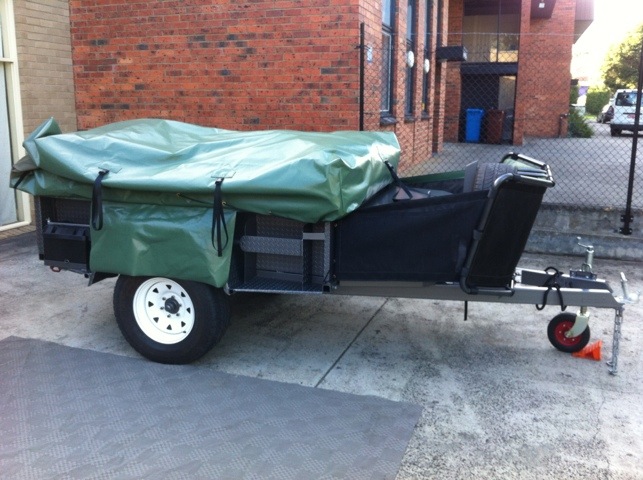
Here’s a few photos of the camper when new picked it up from Tambo.

20120517-075430.jpg

20120517-075458.jpg

20120517-075511.jpg

20120517-075520.jpg

 
Leave a comment

Posted by on May 18, 2012 in Camper Trailers, Travel


Tags: ,