RSS

Category Archives: Modifications

Rhino Roof Rack

We bought a Rhino Roof Rack and Roof Box a few weeks ago, but didn’t get round to installing it right away and now I’m paying the price of this procrastination.

When I went to install it yesterday there were two tiny, but crucial, pieces of the assembly missing (the little nut in the centre of the assembly, see below). So I couldn’t install it and we are leaving in just 5 days time.

Houston, we have a problem...

Houston, we have a problem…

Thankfully the people at Roof Rack City have agreed to express post the missing parts immediately. Fingers crossed they get here before Friday!

 
Leave a comment

Posted by on December 17, 2012 in Accessories, Camping, Modifications


Tags: , ,

Installing the Drifta kitchen

The last time I did any form of DIY was just too long ago to remember. Which made the task of installing the Drifta kitchen somewhat daunting.

I needn’t have been worried as instructions were supplied by Drifta, complete with pretty pictures, on how to install the kitchen in a trailer. A Tambo trailer no less. The distinction is important as the Tambos have a lip in the tailgate opening that needs to be catered for.

I’m not going to regurgitate everything on the Drifta website, you can go there to see the details and the pretty pictures yourself, but I will just briefly mention the steps I took to install the kitchen.

It was pretty straight forward to do:

  • Insert skids into the trailer.
  • Place kitchen unit onto the skids.
  • Move the unit into place.
  • Mark the position of the skids with a good marker pen.
  • Remove the kitchen unit and the skids.
  • Measure where the bolt holes will go and mark off in the trailer (this is to make sure you are not drilling to the water tank, or any other critical equipment).
  • Get someone else to check the measurements. Just in case.
  • Drill pilot holes at the marked off points.
  • Drill required sized holes on top of the pilot holes*
  • Put the skids back into place.
  • Screw in the self-tapping screws from the bottom of the trailer into the skids.
  • Replace the kitchen unit.


*This was a great tip I picked up on the forums. Drill a pilot hole before drilling with the final sized bit. This will ensure a nice clean, round hole that the bolt will fit snugly into


Oh, and make sure that your drill battery is charged before you attempt to do the installation. It sucks being half way through where drills dies and you then have to wait for an hour or two before you can finish the job.


I was so busy installing the unit that I forgot to take any pictures! Hopefully I’ll get better at this as time goes by and you will have more informative posts from me. 🙂


Tags: , , ,

Preparing for the first camping trip

Can you ever be totally prepared? I doubt it.

But you need to start somewhere. So now that we have taken ownership of a new camper trailer (our awesome Tambo Cooper XT) we need to spend some time kitting it out and getting it ready for all the future trips we will be going on.

Luckily for us we our camper was ready a week earlier than anticipated, so we had a week to prepare before our first trip out to Boar Gully Camp site in the Brisbane Ranges National Park. This is what we managed to get done before that first trip:

  • Install Drifta Kitchen
  • Install some LED lights in the trailer and the toolbox – these are of the battery type, so no wiring required.
  • Packed up the Drifta kitchen
  • Checked the battery was charged and in working order
  • Packed the trailer
  • Fixed the hitch tow-bar – it was rattling like crazy.
  • Adjusted the brake controller settings to suit a loaded trailer.
  • Took a few pictures

Not too much in the way of DIY just yet, but I know that will come in time. Here are few photos:

;

20120517-125122.jpg

Hitch bar – Duct taped to stop the incessant rattle

Drifta Kitchen all installed!

Drifta Kitchen all installed!


Tags: , , , ,

Installing a brake controller

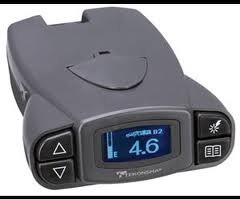
Tekonsha P3 Brake Controller

Tekonsha P3 Brake Controller

If you are towing a trailer that is over 750kg it has to be ‘braked’. That means that you need brakes on the trailer so that you are not reliant solely on the towing vehicle for stopping power.

We bought a Tekonsha P3 Prodigy brake controller off of eBay. This is supposedly one of the better brake controller unit available on the market and I know of several people who have these and they swear by them. There are a couple of options when buying the brake controller from eBay:

  1. Purchase the unit only
  2. Purchase the unit along with all the wiring/cabling required for installation

There is a price difference of about $50 – $80 depending on what package you get and who you buy from. I decided that I could source the wiring for much cheaper than what was being offered on eBay so I bought the unit only. First mistake. Really bad idea.

Once I had the controller and had read through the manual and the requirements for installation I went ahead and tried to source the wiring components. This consists of cable, connectors, plugs, cable ties, and a circuit breaker. I managed to find everything except the actual cable required; which is a twin core 5mm cable. I must have spent nearly 6 hours trying to source the cable locally without any luck – about the time it would have taken me to do the installation had I just ordered the wiring package along with the controller.

Anyway, after much frustration and a realisation that I was probably not quite ready to do any auto-electric installations myself, I called up and couple of auto electricians and booked the vehicle in for the installation. It wasn’t cheap at $200, but it was done in a day by a qualified auto-electrician.

Sometimes it’s better to let the professionals get involved and do the job properly!


Tags: , ,

The Drifta

If that title is meaningless to you then read on. You’ll be glad that you did.

Drifta Camping and Trailer Kitchens

Drifta Camping and Trailer Kitchens

Drifta is a brand name. Of a bloody awesome camping & trailer kitchen supplier.

I had never heard about Drifta kitchens before seeing an amazing kitchen in a picture for a second hand Camper Trailer that was for sale. I had to zoom in a bit to see the name of the kitchen that was branded on the end of it, and I’m so glad that I did. There was the web address www.drifta.com.au. Then the whole world of camping kitchens and storage units opened up before me.

Luke Sutton’s website is something to behold. I have never quite seen so much content about kitchens and storage, specifically for camping/trailers. I think I was glued to the website for nearly an hour, at least. Needless to say that even though we had not yet decided on a trailer (at that stage) I knew that I would be getting one of the Drifta Pull Out with Return (DPOR) kitchens. Here it is:

The Drifta Pull Out Kitchen With Return

The Drifta Pull Out Kitchen With Return

And here is ours. The day we got it we set it all up inside the house to pack it up ready for the first camping trip, and we hadn’t event got the Trailer yet!

Our DPOR Unit

And not 2 hours after picking up our brand new trailer we installed the kitchen:

DPOR Kitchen Installed

I cannot begin to tell you about the craftsmanship and detail that has gone into this unit. It is so well put together, so well thought out and so well finished that I would have happily paid more for it.

There are people that will say the Drifta units are more expensive than their steel import counterparts, but I disagree.This unit is extremely functional; it has a large cupboard at one end split by a shelf, 3 drawers for all the essentials (ours has all our utensils, cutlery, crockery and a bunch of ‘stuff’ that usually inhabits the second or third drawn down in any kitchen), a wash tub conveniently tucked away under the perfect space for a 3 burner stove (which Drifta also provides for an additional $70), a couple of other storage areas and then there is the extra workbench. You wouldn’t get that in you stainless steel kitchen for the same money.

I’m sold, and the quality of this product will make certain that I will be looking more closely at all the other products that Luke has available and seeing what else will fit in the Cooper XT!


Tags: , ,